Introduction
Pressure cook condensed milk, it’s one of those humble kitchen tricks that turns an ordinary pantry item into something rich, indulgent, and unforgettable. The first time I tried to pressure cook condensed milk, it was a rainy evening in Toronto. I had a quiet kitchen, a craving for something sweet, and a can of sweetened condensed milk just waiting for some magic.
Growing up just outside of Bath, I remember my mum and nan always had tricks for creating comfort food from almost nothing. But here I was, far from home, using a modern shortcut they never had: a pressure cooker. And what a shortcut it is! When you pressure cook condensed milk, you’re not just saving time you’re creating thick, velvety dulce de leche in under 30 minutes.
All it takes is one sealed can, submerged in water inside a pressure cooker, and a bit of patience. No stirring. No monitoring. Just pure caramel bliss at the end. It’s the kind of recipe that fits perfectly in my kitchen philosophy easy, full of heart, and something you can do while life hums on around you.
If you’ve never tried to pressure cook condensed milk before, this is your sign. It’s simple, safe, and delivers incredible results. Whether you’re spooning it into cookies, swirling it through brownies, or just enjoying it on toast, you’ll wonder why you didn’t try it sooner.
Table of Contents
Why Pressure Cook Condensed Milk? The Science & Simplicity Behind It
– The Science of Transforming Sweetened Condensed Milk
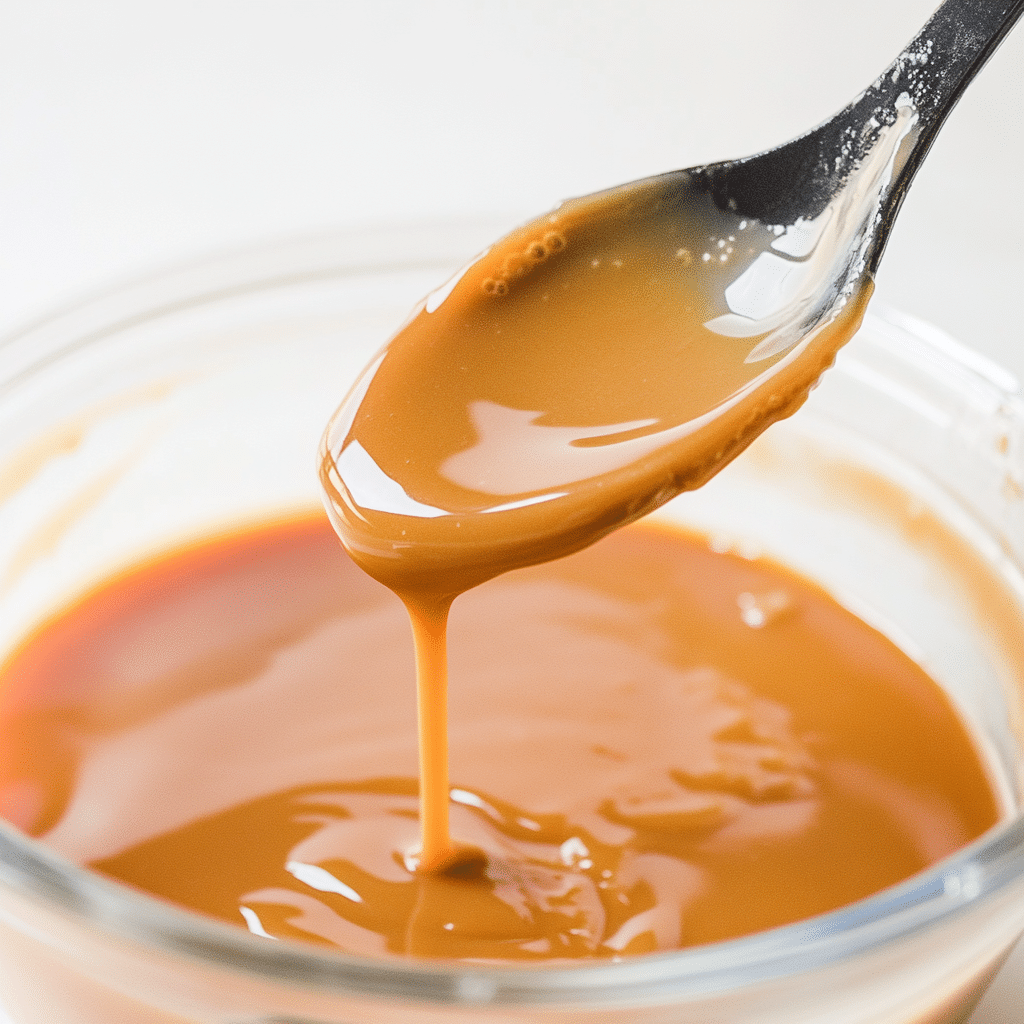
When you pressure cook condensed milk, something magical happens. The heat and pressure inside the sealed pot cause the milk and sugar to undergo the Maillard reaction a process that deepens the color, thickens the texture, and intensifies the flavor. What starts as a pale, syrupy milk becomes a smooth, spoonable caramel that’s richer and silkier than any store-bought version.
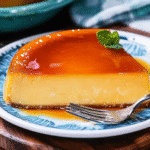
This transformation normally takes hours on the stovetop. But under pressure, the same results are achieved in a fraction of the time without constant stirring, scalding, or stress. In less than 30 minutes, you’ll have a golden dulce de leche perfect for cakes, cookies, and even coffee.
– Why Use a Pressure Cooker Instead of Other Methods?
You could simmer condensed milk in a saucepan or bake it in a water bath in the oven but both methods require more time and attention. All you need to do is lock the lid and relax while the pressure cooker works its magic. It’s faster, cleaner, and more reliable. This method keeps the milk safe from burning or turning too thick too quickly.
Another bonus? Uniformity. Pressure cooking surrounds the can with steam, cooking the contents evenly throughout. No gritty texture. No crusty edges. Just consistent, creamy caramel.
– How Long Does It Take to Pressure Cook Condensed Milk?
Timing depends on your desired texture:
| Cook Time | Texture | Best Use |
|---|---|---|
| 20 min | Soft and pourable | Ice cream topping, coffee |
| 25 min | Thick and spreadable | Cookies, toast, dipping |
| 30 min | Very thick and firm | Cake filling, truffles |
Once done, cool the can completely before opening. You can speed this up by placing it in an ice water bath for 1 hour.
– Is It Safe to Pressure Cook a Sealed Can?
Yes if done correctly. Always follow these safety tips:
- Remove the label first to prevent clogging your valve.
- Fully submerge the can with at least 2 inches of water above it.
- Never open the can while it’s hot. The pressure inside can cause it to erupt.
This method has been used for generations in Brazilian and Algerian kitchens, and when done carefully, it’s a safe and time-saving way to get incredible results.

Step-by-Step Guide: How to Pressure Cook Condensed Milk Safely
– What You’ll Need Before You Start
To pressure cook condensed milk the right way, all you need are a few kitchen staples:
- 1 (14 oz) can of sweetened condensed milk (any brand)
- A stovetop or electric pressure cooker
- Tongs or a jar lifter
- A sponge to scrub off labels
- Cold water and ice
That’s it. One simple ingredient, and you’re ready to create golden, caramel perfection.
– Preparing the Can Before Cooking
Before you pressure cook condensed milk, prep the can by removing the paper label completely. Paper can loosen and float during cooking, potentially clogging the release valve. Use warm water and a sponge to remove all traces of glue.
Lay the can on its side in the pot and cover it with at least 2 inches of water. For safety, this water level should remain steady the entire time you pressure cook condensed milk.
– How Long to Pressure Cook Condensed Milk
Once sealed, heat the pressure cooker over medium until the pressure builds and you hear a steady hiss. Then start your timer.
| Texture | Time | What It’s Best For |
|---|---|---|
| Light and Pourable | 20 min | Coffee, drizzle, yogurt |
| Thick and Creamy | 25 min | Cookies, toast, fillings |
| Dense and Fudgy | 30 min | Cake layers, candy recipes |
After you pressure cook condensed milk, never open the can right away. Always allow it to cool completely. Use tongs to move the can to an ice bath for at least 1 hour.
– Safety Tips to Follow Every Time
- Never open the can while it’s hot. The pressure inside can cause it to erupt.
- Keep the can fully submerged to avoid overheating.
- Only cook one can at a time to ensure safe and even heating.
Once you pressure cook condensed milk and let it cool, the results are always worth it—deep, rich, caramel flavor with zero stress.
Delicious Ways to Use Pressure Cooked Condensed Milk (Dulce de Leche)
– Spread It, Spoon It, or Swirl It into Everything
Once you pressure cook condensed milk, you’ll find yourself reaching for it more than you expected. It’s rich, smooth, and incredibly versatile. From breakfast to dessert, it brings a touch of indulgence to just about everything.
Here are some irresistible ways to use your homemade dulce de leche:
| Use | Description |
|---|---|
| Spread on toast | A buttery alternative to jam—perfect for morning tea |
| Filling for cookies or churros | Pipe it into snickerdoodles, sandwich cookies, or churros |
| Ice cream topping | Warm and drizzle over vanilla, chocolate, or coffee ice cream |
| Swirl into brownies | Add spoonfuls before baking for a caramel marble effect |
| Coffee or hot cocoa | Stir in a spoonful for a sweet, creamy twist |
| Dip for fruit | Especially good with apple slices, bananas, or strawberries |
– Store It the Right Way
After you pressure cook condensed milk and open the cooled can, transfer the dulce de leche to a clean, airtight glass jar or container. Keep it refrigerated and enjoy within two weeks. It may thicken slightly over time just warm it up in the microwave for a few seconds to restore its creamy texture.
– Can You Freeze It?
Absolutely. Spoon the cooled dulce de leche into a freezer-safe container, leaving some room for expansion. It’ll keep for up to 3 months. Thaw it overnight in the fridge before use.
– Creative Recipes Using Dulce de Leche
Now that you’ve mastered how to pressure cook condensed milk, why stop there? Add your homemade caramel to:
- Layered trifles or parfaits
- Milkshakes and frappes
- Pancakes and crepes
- Banana bread or muffins
- Cheesecake toppings

Mistakes to Avoid When You Pressure Cook Condensed Milk
– Don’t Skip Label Removal
Before you pressure cook condensed milk, always remove the label. Paper and adhesive can come loose, float inside the pot, and clog your pressure release valve causing serious safety risks. Scrub off all residue with warm water and a sponge before placing the can in the cooker.
– Never Let the Water Level Drop
One of the most important rules? Keep the can fully submerged at all times. Letting the water line fall below the can increases the risk of overheating or even bursting. When you pressure cook condensed milk, the water acts as insulation and even heat distribution.
Tip: Add a little extra water than you think you’ll need it’s better to be safe than run dry halfway through the cook.
– Don’t Open the Can Too Soon
Impatience can lead to disaster. The pressure inside the can builds significantly during cooking, and opening it before it’s fully cooled can cause hot caramel to erupt dangerous and messy.
Always let the can cool completely, or place it in an ice water bath for at least an hour after pressure cooking.
– Avoid Overcooking Without Monitoring
While it’s tempting to go for that deep, fudgy caramel, don’t overdo it. Cooking beyond 30 minutes can result in a too-thick, overly dark spread. Stick to the timing guide:
- 20 min: soft and pourable
- 25 min: thick and creamy
- 30 min: rich and dense
Going over 30 minutes may change the flavor profile or harden the texture too much for most recipes.
– Don’t Use Damaged or Bulging Cans
Only pressure cook condensed milk in cans that are in perfect condition. Avoid dented, rusted, or bulging cans, as they may not withstand pressure safely. Always inspect the can before using it.
When done right, this method delivers safe, consistent results and makes every dessert feel a little more special.
Cultural Origins: From Brazil to Your Kitchen – The Story Behind Pressure Cooked Dulce de Leche
– The Brazilian Way to Pressure Cook Condensed Milk
If you’ve ever wandered into a Brazilian kitchen, there’s a good chance you’ve seen someone pressure cook condensed milk without a second thought. In Brazil, doce de leite is more than a dessert it’s tradition. Sweetened condensed milk is turned into caramel gold using a pressure cooker, then spread into cakes, piped into brigadeiros, or spooned over toast with a side of strong coffee.
It’s fast, efficient, and deeply rooted in everyday life. Brazilians have trusted this method for generations not just for speed, but for the rich, consistent flavor it produces.
– The Algerian Connection: A Generational Technique
Across the ocean in Algerian homes, the same method shows up with a slightly different name dulce de leche or sometimes simply caramel. Grandmothers pass down the knowledge of how to pressure cook condensed milk like a kitchen secret. It’s often used in celebration sweets, served during family gatherings, and loved as a luxurious addition to even the simplest cakes.
This shared method across continents and cultures is a reminder that great food doesn’t have to be complicated. Just one can, a pot, and a bit of patience.
– A Global Shortcut with Old-World Roots
Today, home cooks from Canada to the UK are embracing this shortcut with open arms. Whether learned from a YouTube video or handed down from family, the method to pressure cook condensed milk is now a trusted global go-to.
And while modern pressure cookers add convenience and safety, the heart of this tradition remains unchanged making something extraordinary from something simple.

Storage Tips: How to Keep Your Pressure Cooked Condensed Milk Fresh
– Storing It After Cooking
Once you’ve successfully pressure cook condensed milk and allowed the can to cool fully, it’s time to transfer the dulce de leche to a clean, airtight container. A glass jar with a tight-fitting lid is ideal for maintaining freshness and preventing odors from other foods in your fridge from seeping in.
Refrigerate it and enjoy within 14 days for the best taste and texture.
Need to loosen it up? Just microwave for 10–15 seconds and stir gently.
– Can You Freeze Dulce de Leche?
Definitely! When you’ve made extra or want to store some for later use:
- Transfer the cooled dulce de leche into a freezer-safe container
- Leave about ½ inch of space at the top for expansion
- Label it with the date
Dulce de leche can be frozen for up to 3 months. Just thaw it in the fridge overnight and give it a good stir to bring back its smooth texture.
– Signs It’s No Longer Good
Here’s how to know your dulce de leche has gone past its prime:
- Sour smell or off taste
- Mold or discoloration
- Thick, gritty, or separated texture
If you notice any of these signs, it’s best to discard it and pressure cook condensed milk fresh when needed.
– Best Containers for Storage
| Container Type | Pros | Storage Time |
|---|---|---|
| Glass jars (airtight) | Best for flavor & safety | Up to 2 weeks refrigerated |
| BPA-free plastic containers | Lightweight, freezer-safe | Up to 3 months frozen |
| Resealable silicone bags | Great for small portions | 1–2 months frozen |
Creative Variations: Flavor Twists and Recipe Ideas with Dulce de Leche
– Simple Ways to Add Flavor After You Pressure Cook Condensed Milk
Once you’ve learned how to pressure cook condensed milk, there’s a whole world of flavors waiting to be explored. The beauty of homemade dulce de leche is how easily it adapts to additions. Here are a few delicious ways to customize it:
| Flavor Add-In | How to Use It |
|---|---|
| Sea salt | Stir in a pinch for a salted caramel variation |
| Vanilla extract | Add ½ tsp after cooling for a richer aroma |
| Cinnamon or nutmeg | Mix in a pinch for warmth and spice |
| Espresso powder | Dissolve a small amount for a coffee-caramel twist |
| Cocoa powder | Blend in 1–2 tsp for a chocolate dulce de leche |
Each one adds a new layer of depth to your dulce de leche, transforming it from simple to unforgettable.
– Recipe Ideas Using Your Flavored Dulce de Leche
Now that you’ve mastered how to pressure cook condensed milk, use your flavored versions in creative ways:
- Salted caramel apple dip: Perfect for parties or after-school snacks
- Dulce de leche latte: Add 1–2 spoonfuls to coffee with steamed milk
- Cinnamon caramel pancakes: Swirl into pancake batter or drizzle on top
- Espresso caramel trifle: Layer with whipped cream and brownies
- Chocolate caramel tart: Use as a filling over a cookie crust and chill
– Kid-Friendly Ideas
Need a way to get the kids excited? Try these easy ideas:
- Dulce de leche banana bites
- Mini graham cracker sandwiches
- Make-your-own dessert tacos with soft tortillas, fresh fruit, and a drizzle of dulce de leche
Add a drizzle, a swirl, or a spoonful once you pressure cook condensed milk, it becomes your most versatile dessert ingredient.
Final Thoughts and Pro Tips for Perfect Pressure Cooked Condensed Milk Every Time
– Recap: Why Pressure Cook Condensed Milk?
By now, it’s clear when you pressure cook condensed milk, you’re not just saving time. You’re unlocking an easier, safer, and deeply flavorful way to make dulce de leche. It’s quicker than traditional stovetop methods, hands-off, and nearly foolproof when done right.
Whether you’re making a small batch for breakfast toast or prepping a jar to use throughout the week, this method delivers consistent results every time.
– Pro Tips for the Best Results
Here are a few final tips to make sure your dulce de leche turns out perfect every time:
- Use a good quality can of sweetened condensed milk. While most brands work fine, some may produce a creamier result than others.
- Stick to a single layer of cans. Don’t stack them or try to crowd the pot this can affect cooking time and safety.
- Keep the water level consistent. Check midway through if needed, especially for longer cook times.
- Always allow the can to cool fully. Rushing this step is one of the most common mistakes.
– What to Do With Leftovers
If you’ve made more than you can eat in one go, don’t worry. As we covered, your dulce de leche will keep in the fridge for up to 2 weeks, and in the freezer for up to 3 months. Spoon it into coffee, tuck it into cookies, or warm it up for a sweet dip there’s no wrong way to enjoy it.
Conclusion: One Can, One Pot, Endless Possibilities
Once you learn how to pressure cook condensed milk, it quickly becomes one of those go-to kitchen hacks you’ll return to again and again. It’s simple, quick, and transforms a humble pantry staple into something that tastes gourmet.
From Brazil to Algeria and now to kitchens around the world, this method has proven to be more than just a shortcut it’s a sweet little secret shared across cultures. Whether you drizzle it on desserts, swirl it into coffee, or spoon it straight from the jar, dulce de leche made this way carries warmth, ease, and flavor in every bite.
for more recipe follow me in pinterest.
FAQs
Can I put a can of condensed milk in a pressure cooker?
Yes, you absolutely can. In fact, pressure cooking sweetened condensed milk in its sealed can is one of the simplest ways to create rich, golden dulce de leche with minimal effort. Just be sure to remove the label, submerge the can in water by at least 2 inches, and allow it to cool completely before opening. Always follow safety precautions and never cook a damaged or bulging can.
How long does it take to caramelize condensed milk in a pressure cooker?
It depends on the texture you’re aiming for:
20 minutes: Soft and pourable
25 minutes: Thick and spreadable
30 minutes: Dense and fudgy
After pressure cooking condensed milk, always let the can cool completely before opening to prevent hot dulce de leche from spilling under pressure.
Is it safe to pressure cook condensed milk?
Yes when done properly, it’s a safe and popular method, especially in countries like Brazil and Algeria. It’s a trusted way to make homemade dulce de leche. Just make sure the can is fully submerged in water, don’t stack cans, and never open the can while it’s still hot. For faster and safer cooling, place the can in an ice bath before opening.
What doesn’t belong in a pressure cooker?
Not everything is suited for pressure cooking. Avoid these in your pressure cooker:
Starchy foods like flour or cornstarch can clog the pressure release valve, making them risky to cook under pressure.
Milk-based sauces (unless specifically adapted)
Delicate pastries or fried items
Open canned goods